
Sun Support Trick Room + Torkoal + Marowak + Stakataka Hyper Offense


(I vibed to this so often while spamming the Team and it fits how it feels when you play LOL)
1. Introduction
Hello everyone! This Post is my second RMT and this time I want to present you a Team I had great success and fun with in the last Month, which is my own personal Spin on a Trick Room Team. I've always liked using these Styles of Teams since you can turn Pokemon that are usually held back by their horrible Speed Stat into absolute Monsters. One of the Pokemon which I personally liked ever since I played Ultra Moon was Stakataka. Wanting to make it work in SS OU I tried many previous Team Compositions and sets like AV or Shuca/Chople Berry, which I ended up ditching since it lacked recovery and Wishpassing with Clef or the likes was really predictable. For that reason I turned my eyes towards the unusual Style of Trick Room, which also bring me to the Team I will show you today! ^-^
( AS OF 9/11/22 I POSTED AN UPDATED VERSION WITH OPTIMIZED SETS + EXPLANATION, PLEASE REFER TO THE UPDATED POKEPASTE LINKED AT THE BOTTOM OF THE POST, THANK YOU!)
2. The Team
 Hatterene @ Focus Sash
Ability: Magic Bounce
Shiny: Yes
EVs: 252 HP / 252 SpA / 4 SpD
or: 252 HP / 80 Def / 176 SpA
or: 176 HP / 80 Def / 252 SpA
Quiet Nature
IVs: 0 Atk / 0 Spe
- Trick Room
- Mystical Fire
- Psyshock / Psychic
- Healing Wish / Misty Explosion
General Role:
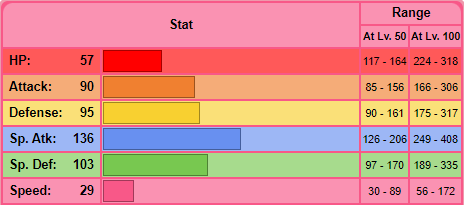
Hatterene can fill many roles for the Team, depending on what you need it for. The Role I picked it for and undeniably its best use is being played as a Offensive Trick Room Setter. Due to its Item Focus Sash it can also serve as a revenge Killer, assuming no hazards are up and it sits at 100% HP it can live any Single Strike hit with it being able to sponge a lot of non effective hits, even when not at full Health, due to its HP Investment which you can easily fit on a Trick Room Team. Furthermore it can be used as a form of dealing with Hazards and makes for a great Lead due to the Ability Magic Bounce, but can also be used as a Sweeper in certain Matchups, don't forget it hits a whopping 408 SpAtk with its Base Stat of 136!
Moveset:
Trick Room is pretty self explanatory here, since that is what you will mainly use it for. Mystical Fire serves as its main coverage move and can notably hit Steel Types quite hard with it. Mystical Fire is an overall great move with the additional 100% drop to the SpAtk Stat of your opponent and fits well here, especially since it can come in clutch under Sun with the damage boost. Next I opted for Psyshock over Psychic due to a lot of Pokemon in the current metagame running SpD investment like or
or  . Furthermore it hits Pokemon like
  and other notable SpD Walls. Lastly I went with Healing Wish since in my opinion it is an insanely good move that can be used in many smart ways for you to dominate and win games (Misty Explosion is also fine here just I never found it to be of any major use). You can read more about Healing Wish and its Storing Mechanics over here (-> Section 1.3)
EV/IV Spread:
The EV Spreads are very straight forward with mostly only Max/Max Spreads in HP and the Attacking Stat of your choice, but I'll include them for the sake of information regardless. As I already mentioned 252 HP lets you sponge, even though Hatterene only has a Base HP of 57, quite some hits. 252 SpAtk EVs paired with a Quiet Nature are recommended here since it maximizes the damage output and you dont really gain any notable advantages from putting Defense EVs into it that would justify dropping any SpAtk.
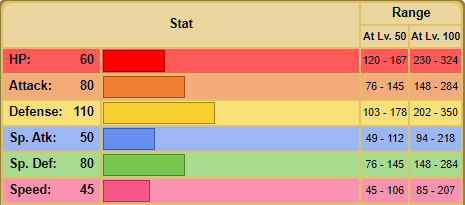
 Cresselia @ Mental Herb
Ability: Levitate
EVs: 252 HP / 252 Def / 4 SpD
Relaxed Nature / Bold Nature
IVs: 0 Atk (/ 9 Spe (If Bold Nature))
- Trick Room
- Ice Beam / Moonblast
- Moonlight
- Lunar Dance
General Role:
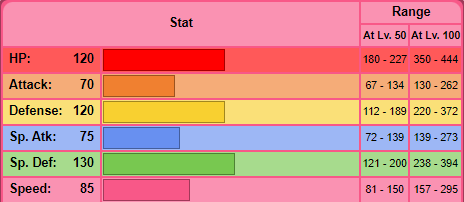
Oh hey look, it's the second Trick Room Setter on the List. This Time it's a defensive one, though! This Defensive Behemoth can live almost any neutral hit physically and with its 130 SpD Base Stat it is also strong suited in that department. It also provides us a Ground Immunity with the Ability Levitate, which is very valuable for this Team. Due to the Item Mental Herb it can get at least one Trick Room off and then u can work from there with hard switches into your breakers or even Lunar Dancing into them to work with your hard hitting Pokemon from there.
Moveset:
I think I will not have to explain the choice for Trick Room again, since... well... this is a Trick Room Team after all ^^'. For your attacking Move I recommend Ice Beam over Moonblast since it deals with, and  way better than Moonblast does and provides you with a chance to freeze, too, isn't Freeze just awesome ;D ? Instead of opting for another Status Move like Toxic or the likes, I opted for Moonlight there. This helps with longevity, which you often need in some Matchups, notably stalling out Double Iron Bash on
  (remember that Moonlight Heals 3/4 of your HP in Sun) which is very hard to face. Lunar Dance basically works the same as Healing Wish, just that it restores PP on top of the things that Healing Wish already grant you, which can be used to heal up
  's Eruption PP etc. ,depending on the Situation. Please note that Lunar Dance does not get stored if you aren't at max PP in all moves on one Pokemon, which means that if you clicked a move just once on any Pokemon, Lunar Dance will be consumed immediately upon switchin in even if at Max HP and no Status, more abt the Mechanics here (-> 1.3)
EV/IV Spread:
Max HP / Max Def here for properly walling sweepers like Dragonite and Garchomp, dealing with Melmetal and some others as well. This Pokemon just lives a lot of things and provides a great physical wall here. 31 Speed IVs are recommended here instead of the usual 0 so you can stall out Melmetals Double Iron Bashes without having the risk to get flinched by it (DIB has 60% chance to flinch, some as Serene Grace and
and  ' Iron Head and Air Slash).
 Porygon2 @ Eviolite
Ability: Trace
Shiny: Yes
EVs: 252 HP / 4 Def / 252 SpD
Sassy Nature
IVs: 0 Atk / 0 Spe
- Trick Room
- Magic Coat / Ice Beam
- Teleport
- Recover
General Role:
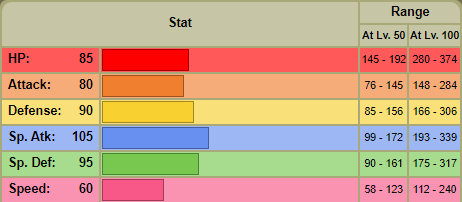
Alright, Trick Room Setter Number 3, this one is a pretty cool one. This serves as a Setter as well as a SpD wall with its Item Eviolite, boosting both its Defense Stats by 1.5x. This, as well as Cresselia lives most neutral hits and can provide the Team with safe switches and momentum in form of Teleport. There is not much more to it besides fitting the 3rd Trick Room Setter Spot and being kind of a glue for the team.
Moveset:
For Trick Room you can just fill the lines yourself, I think thats pretty self explanatory now. Alright so for the next move I opted for Magic Coat instead of Ice Beam for the cause of utility, blocking Taunts, hazards and Status is just so broken because this move is spammable, its not like Protect which fails after some time, you can spam it all the way. In combination with Trace this allows for some cool exchanges, since it can trace stuff like Water/Volt Absorb as well as Flash Fire. That way you can outplay very well on Lead.
Teleport and Recover are pretty self explanatory, Teleport for Momentum and Recover for longevity.
very well on Lead.
Teleport and Recover are pretty self explanatory, Teleport for Momentum and Recover for longevity.
EV/IV Spread:
Max/Max is here for optimally SpD walling, there is not much to it, it doesnt get more basic than that.
 Torkoal @ Choice Specs
Ability: Drought
EVs: 248 HP / 252 SpA / 8 SpD
or: 252 Def / 252 SpA / 4 SpD (if Body Press)
Quiet Nature
IVs: 0 Atk / 0 Spe
- Eruption
- Earth Power
- Solar Beam / Body Press
- Weather Ball
General Role:
Ok so finally we get to the Heat. This Pokemon is just a nightmare to face since even resists get 2HKOed by this monstrosities'150BP Eruption under Sun. This Pokemon can set up Sun for the team for 5 Turns and just shred through almost anything in the Metagame. I'd recommend you try it out and see for yourself what I mean, make the right predicts and barely anything lives, have fun going through your opponents Easy Breezy ;D. If you dont want to have to predict you can use Charcoal also but it misses out on a lot of important 2HKOes vs Resists
Moveset:
Alright so Eruption is the main STAB you want to be clicking with this Pokemon. 150BP Specs STAB under Sun is just broken af, try it out for yourself so you will see what I mean. Earth Power is one of two coverage moves I opted for, notably for getting rid of. Solar Beam is the second coverage move I put on this, instant charges in Sun are really nice and 120BP can hit some Water Types crazy hard f.E  or
or  that otherwise might give you a lot of trouble breaking. As a last move I opted for Weather Ball since it, unlike Eruption has a consistent damage output which doesnt rely on having high HP. this can be important in some Matchups which I will get to later on. If you want a better Matchup versus Tyranitar I recommend you use Body Press instead of Solar Beam if you feel comfortable in beating stuff like
  among other bulky waters
EV/IV Spread:
Alright so I would like to say that the EV Spreads on the breakers are as simple as the Trick Room setters Spreads, just offensively. Max Attack stat of your choice plus usually Max HP or close to it for Bulk.
 Marowak-Alola @ Thick Club
Ability: Rock Head
EVs: 248 HP / 252 Atk / 8 SpD
Brave Nature
IVs: 0 Spe (or 1 Spe / 2 Spe)
- Flare Blitz
- Poltergeist
- Swords Dance
- Earthquake / Bonemerang
General Role:
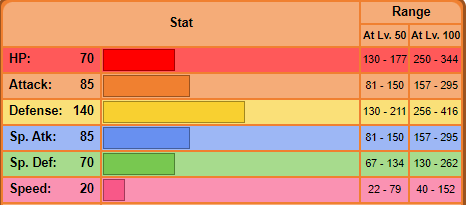
Alright Breaker Number 2, Marowak-Alola is just THE Staple Breaker of Trick Room Teams. Thick Club basically gives this mon a 160 Base Attack which is mind-boggling. This Thing hits like a Monster Truck and with the access to Swords Dance this is just a menace is every way. This Pokemon also makes use of's Sun and can help break down its checks like  so Torkoal can sweep.
Moveset:
Flare Blitz is really spammable on this and with Poltergeist this will be what you will mostly aim to click. Poltergeist is next up and also mandatory on this. Poltergeist can miss but it is still a very broken move regardless, being able to see what Items the target has on top of hitting insanely hard. Swords Dance is overkill in most cases but sometimes needed so you can setup since you almost always live a hit so it is there too. Alright so for the last slot you can go either Earthquake or Bonemerang. Since Bonemerang just has 90% accuracy instead of 100% I'd recommend you to use Earthquake instead but if you want something vs Grassy Terrain shenanigans then sure, go for it.
EV/IV Spread:
Same here as Torkoal, HP lets it sponge some hits and KO back which is really nice. Usually you go 0 IVs in Speed but in Trick Room Mirror Matchups 1 EV in speed can ensure you outspeed opposing Marowaks outside of Trick Room, which it will usually come down to. Use whichever you prefer :D
 Stakataka @ Life Orb
Ability: Beast Boost
Shiny: Yes
EVs: 252 HP / 252 Atk / 4 SpD
Lonely Nature
IVs: 15 Def / 0 Spe
- Gyro Ball
- Earthquake
- Stone Edge
- Heat Crash
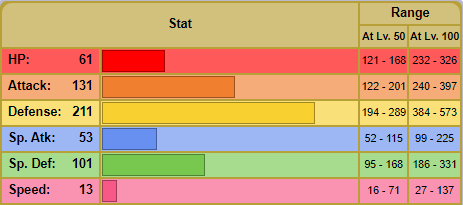
General Role:
Last off we have the golden Block itself, breaker Number 3. You may think what makes this better than. Well, so, on this Team, after thorough testing I came to the conclusion it fits the role of a breaker better than melmetal does. Being able to OHKO  is really valuable, boosting your Attack after each kill lets you Snowball very fast and 2 great STABs on top of good coverage made the choice for me easier that this was better than Melmetal on this team.
Moveset:
First off is Gyro Ball, a usually very consistent STAB since Stakataka is so slow it often hits above 100BP at the very least. Earthquake is to hit and other would be checks to it while Stone Edge as the second STAB can also hit many threats to great damage. Heat Crash over Trick Room just feels way more smooth and consistent, being able to OHKO a lot of things, especially under Sun.
EV/IV Spread:
Alright so I think I only have to explain the IVs here which are 15 Defense IVs, this is so it hits 397 defense and 397 Attack. In case of a Tie it will always pick in the following order " Attack, Defense, Special Attack, Special Defense, and Speed ". This way you maximize your Defense while still ensuring Attack Boosts 100% of the time.
3. Teambuilding Process


So starting with these 3, they are just undoubtedly the best Trick Room setters there are, so it was an easy choice for me to make
yeah I like the hot Turtle and under TR its crazy strong so I went with that

Absolute must-have on Trick Room Teams, decision was easy since it helped break down Torkoals would be checks like Slowking

for the above mentioned reasons I switched Melmetal out and brought this Beast in
4. Threat List

This can be beaten but it's annoying to face since Quad resist to Torkoal and specs flamethrower 2HKOes P2 in Sun which sucks so just be careful around this and play Stakataka and Marowak well

not too much of an issue unless the opponent plays it well, in that case just try to preserve Hatterene to threaten Psyshock etc.
This is probably the biggest Threat to the Team since Double Iron Bash can flinch. If you see this in Team preview ALWAYS lead Torkoal no matter what, if they lead melmetal click weather ball always, if not u have to switch so theres not much else you can do

Sand can be a bit wonky and CB TTar hits very hard but just try and play well with Marowak

This isnt really a threat, just annoying. Play Marowak well and you will be fine

really bad if this flinches, some mons can take hits but die to Iron head flinches, I recommend you make Bold plays in these Offense matchups
EVERY OTHER MATCHUP IS INSANELY DOABLE IF U MAKE APPROPRIATE READS WHERE NECESSARY!
5. How to use
1. Take a lot of time thinking about the Matchup in Team preview: Determining your win conditions is insanely vital for this team to work, look at your Matchup and decide what your gameplan is, otherwise this will backfire. This Team needs a lot of trust in your decisions and good gamesense and knowledge of the game. Unlike other Teams this is NOT a no-brainer team. 1. Introduction
Hello everyone! This Post is my second RMT and this time I want to present you a Team I had great success and fun with in the last Month, which is my own personal Spin on a Trick Room Team. I've always liked using these Styles of Teams since you can turn Pokemon that are usually held back by their horrible Speed Stat into absolute Monsters. One of the Pokemon which I personally liked ever since I played Ultra Moon was Stakataka. Wanting to make it work in SS OU I tried many previous Team Compositions and sets like AV or Shuca/Chople Berry, which I ended up ditching since it lacked recovery and Wishpassing with Clef or the likes was really predictable. For that reason I turned my eyes towards the unusual Style of Trick Room, which also bring me to the Team I will show you today! ^-^
( AS OF 9/11/22 I POSTED AN UPDATED VERSION WITH OPTIMIZED SETS + EXPLANATION, PLEASE REFER TO THE UPDATED POKEPASTE LINKED AT THE BOTTOM OF THE POST, THANK YOU!)
2. The Team
Hatterene @ Focus Sash Ability: Magic Bounce
Shiny: Yes
EVs: 252 HP / 252 SpA / 4 SpD
or: 252 HP / 80 Def / 176 SpA
or: 176 HP / 80 Def / 252 SpA
Quiet Nature
IVs: 0 Atk / 0 Spe
- Trick Room
- Mystical Fire
- Psyshock / Psychic
- Healing Wish / Misty Explosion
General Role:
Hatterene can fill many roles for the Team, depending on what you need it for. The Role I picked it for and undeniably its best use is being played as a Offensive Trick Room Setter. Due to its Item Focus Sash it can also serve as a revenge Killer, assuming no hazards are up and it sits at 100% HP it can live any Single Strike hit with it being able to sponge a lot of non effective hits, even when not at full Health, due to its HP Investment which you can easily fit on a Trick Room Team. Furthermore it can be used as a form of dealing with Hazards and makes for a great Lead due to the Ability Magic Bounce, but can also be used as a Sweeper in certain Matchups, don't forget it hits a whopping 408 SpAtk with its Base Stat of 136!
Moveset:
Trick Room is pretty self explanatory here, since that is what you will mainly use it for. Mystical Fire serves as its main coverage move and can notably hit Steel Types quite hard with it. Mystical Fire is an overall great move with the additional 100% drop to the SpAtk Stat of your opponent and fits well here, especially since it can come in clutch under Sun with the damage boost. Next I opted for Psyshock over Psychic due to a lot of Pokemon in the current metagame running SpD investment like
or . Furthermore it hits Pokemon like and other notable SpD Walls. Lastly I went with Healing Wish since in my opinion it is an insanely good move that can be used in many smart ways for you to dominate and win games (Misty Explosion is also fine here just I never found it to be of any major use). You can read more about Healing Wish and its Storing Mechanics over here (-> Section 1.3)EV/IV Spread:
The EV Spreads are very straight forward with mostly only Max/Max Spreads in HP and the Attacking Stat of your choice, but I'll include them for the sake of information regardless. As I already mentioned 252 HP lets you sponge, even though Hatterene only has a Base HP of 57, quite some hits. 252 SpAtk EVs paired with a Quiet Nature are recommended here since it maximizes the damage output and you dont really gain any notable advantages from putting Defense EVs into it that would justify dropping any SpAtk.
Offensive Calcs:
252+ SpA Hatterene Psyshock vs. 252 HP / 0 Def: 178-211 (45.1 - 53.5%) -- 39.5% chance to 2HKO
252+ SpA Hatterene Mystical Fire vs. 252 HP / 252+ SpD: 244-288 (69.3 - 81.8%) -- guaranteed 2HKO after Leftovers recovery
252+ SpA Hatterene Psyshock vs. 252 HP / 252+ Def: 158-188 (51.9 - 61.8%) -- guaranteed 2HKO
252+ SpA Hatterene Mystical Fire vs. 248 HP / 92 SpD : 192-228 (48.1 - 57.1%) -- 42.2% chance to 2HKO after Leftovers recovery
252+ SpA Hatterene Psyshock vs. 0 HP / 0 Def : 247-292 (100 - 118.2%) -- guaranteed OHKO
Defensive Calcs:
0 Atk Gyro Ball (36 BP) vs. 252 HP / 0 Def Hatterene: 78-92 (24.5 - 28.9%) -- 98.6% chance to 4HKO
252 Atk Choice Band Beat Up (110 BP) vs. 252 HP / 0 Def Hatterene: 265-313 (83.3 - 98.4%) -- guaranteed 2HKO
252 Atk Choice Band Surging Strikes (3 hits) vs. 252 HP / 0 Def Hatterene on a critical hit: 288-342 (90.5 - 107.5%) -- approx. 31.3% chance to OHKO
252+ SpA Hatterene Psyshock vs. 252 HP / 0 Def
: 178-211 (45.1 - 53.5%) -- 39.5% chance to 2HKO252+ SpA Hatterene Mystical Fire vs. 252 HP / 252+ SpD
: 244-288 (69.3 - 81.8%) -- guaranteed 2HKO after Leftovers recovery252+ SpA Hatterene Psyshock vs. 252 HP / 252+ Def
: 158-188 (51.9 - 61.8%) -- guaranteed 2HKO252+ SpA Hatterene Mystical Fire vs. 248 HP / 92 SpD
: 192-228 (48.1 - 57.1%) -- 42.2% chance to 2HKO after Leftovers recovery252+ SpA Hatterene Psyshock vs. 0 HP / 0 Def
: 247-292 (100 - 118.2%) -- guaranteed OHKODefensive Calcs:
0 Atk
Gyro Ball (36 BP) vs. 252 HP / 0 Def Hatterene: 78-92 (24.5 - 28.9%) -- 98.6% chance to 4HKO252 Atk Choice Band
Beat Up (110 BP) vs. 252 HP / 0 Def Hatterene: 265-313 (83.3 - 98.4%) -- guaranteed 2HKO252 Atk Choice Band
Surging Strikes (3 hits) vs. 252 HP / 0 Def Hatterene on a critical hit: 288-342 (90.5 - 107.5%) -- approx. 31.3% chance to OHKO Cresselia @ Mental Herb Ability: Levitate
EVs: 252 HP / 252 Def / 4 SpD
Relaxed Nature / Bold Nature
IVs: 0 Atk (/ 9 Spe (If Bold Nature))
- Trick Room
- Ice Beam / Moonblast
- Moonlight
- Lunar Dance
General Role:
Oh hey look, it's the second Trick Room Setter on the List. This Time it's a defensive one, though! This Defensive Behemoth can live almost any neutral hit physically and with its 130 SpD Base Stat it is also strong suited in that department. It also provides us a Ground Immunity with the Ability Levitate, which is very valuable for this Team. Due to the Item Mental Herb it can get at least one Trick Room off and then u can work from there with hard switches into your breakers or even Lunar Dancing into them to work with your hard hitting Pokemon from there.
Moveset:
I think I will not have to explain the choice for Trick Room again, since... well... this is a Trick Room Team after all ^^'. For your attacking Move I recommend Ice Beam over Moonblast since it deals with
, and way better than Moonblast does and provides you with a chance to freeze, too, isn't Freeze just awesome ;D ? Instead of opting for another Status Move like Toxic or the likes, I opted for Moonlight there. This helps with longevity, which you often need in some Matchups, notably stalling out Double Iron Bash on (remember that Moonlight Heals 3/4 of your HP in Sun) which is very hard to face. Lunar Dance basically works the same as Healing Wish, just that it restores PP on top of the things that Healing Wish already grant you, which can be used to heal up 's Eruption PP etc. ,depending on the Situation. Please note that Lunar Dance does not get stored if you aren't at max PP in all moves on one Pokemon, which means that if you clicked a move just once on any Pokemon, Lunar Dance will be consumed immediately upon switchin in even if at Max HP and no Status, more abt the Mechanics here (-> 1.3)EV/IV Spread:
Max HP / Max Def here for properly walling sweepers like Dragonite and Garchomp, dealing with Melmetal and some others as well. This Pokemon just lives a lot of things and provides a great physical wall here. 31 Speed IVs are recommended here instead of the usual 0 so you can stall out Melmetals Double Iron Bashes without having the risk to get flinched by it (DIB has 60% chance to flinch, some as Serene Grace
and ' Iron Head and Air Slash).Ice Beam Calcs:
0 SpA Cresselia Ice Beam vs. 0 HP / 4 SpD: 232-276 (64.9 - 77.3%) -- guaranteed 2HKO after Leftovers recovery
0 SpA Cresselia Ice Beam vs. 252 HP / 0 SpD: 248-292 (64.9 - 76.4%) -- guaranteed 2HKO after Leftovers recovery
0 SpA Cresselia Ice Beam vs. 0 HP / 4 SpD Multiscale: 102-122 (31.5 - 37.7%) -- 89.2% chance to 3HKO
0 SpA Cresselia Ice Beam vs. 0 HP / 4 SpD: 204-244 (63.1 - 75.5%) -- guaranteed 2HKO
0 SpA Cresselia Ice Beam vs. 0 HP / 4 SpD : 122-144 (47.1 - 55.5%) -- 75% chance to 2HKO
Defensive Calcs:
252 SpA Choice Specs Shadow Ball vs. 252 HP / 4 SpD Cresselia: 260-308 (58.5 - 69.3%) -- guaranteed 2HKO
252 Atk Choice Band Knock Off (97.5 BP) vs. 252 HP / 252+ Def Cresselia: 288-338 (64.8 - 76.1%) -- guaranteed 2HKO
116 Atk Iron Fist Double Iron Bash (2 hits) vs. 252 HP / 252+ Def Cresselia: 150-176 (33.7 - 39.6%) -- approx. 3HKO
252 Atk Choice Band Knock Off (97.5 BP) vs. 252 HP / 252+ Def Cresselia: 260-306 (58.5 - 68.9%) -- guaranteed 2HKO
+2 252 Atk Dual Wingbeat (2 hits) vs. 252 HP / 252+ Def Cresselia: 170-204 (38.2 - 45.9%) -- approx. 3HKO
+4 252 Atk Scale Shot (3 hits) vs. 252 HP / 252+ Def Cresselia: 234-279 (52.7 - 62.8%) -- approx. 2HKO
252 Atk Choice Band Surging Strikes (3 hits) vs. 252 HP / 252+ Def Cresselia on a critical hit: 180-216 (40.5 - 48.6%) -- approx. 3HKO
0 SpA Cresselia Ice Beam vs. 0 HP / 4 SpD
: 232-276 (64.9 - 77.3%) -- guaranteed 2HKO after Leftovers recovery0 SpA Cresselia Ice Beam vs. 252 HP / 0 SpD
: 248-292 (64.9 - 76.4%) -- guaranteed 2HKO after Leftovers recovery0 SpA Cresselia Ice Beam vs. 0 HP / 4 SpD Multiscale
: 102-122 (31.5 - 37.7%) -- 89.2% chance to 3HKO0 SpA Cresselia Ice Beam vs. 0 HP / 4 SpD
: 204-244 (63.1 - 75.5%) -- guaranteed 2HKO0 SpA Cresselia Ice Beam vs. 0 HP / 4 SpD
: 122-144 (47.1 - 55.5%) -- 75% chance to 2HKODefensive Calcs:
252 SpA Choice Specs
Shadow Ball vs. 252 HP / 4 SpD Cresselia: 260-308 (58.5 - 69.3%) -- guaranteed 2HKO252 Atk Choice Band
Knock Off (97.5 BP) vs. 252 HP / 252+ Def Cresselia: 288-338 (64.8 - 76.1%) -- guaranteed 2HKO116 Atk Iron Fist
Double Iron Bash (2 hits) vs. 252 HP / 252+ Def Cresselia: 150-176 (33.7 - 39.6%) -- approx. 3HKO252 Atk Choice Band
Knock Off (97.5 BP) vs. 252 HP / 252+ Def Cresselia: 260-306 (58.5 - 68.9%) -- guaranteed 2HKO+2 252 Atk
Dual Wingbeat (2 hits) vs. 252 HP / 252+ Def Cresselia: 170-204 (38.2 - 45.9%) -- approx. 3HKO+4 252 Atk
Scale Shot (3 hits) vs. 252 HP / 252+ Def Cresselia: 234-279 (52.7 - 62.8%) -- approx. 2HKO252 Atk Choice Band
Surging Strikes (3 hits) vs. 252 HP / 252+ Def Cresselia on a critical hit: 180-216 (40.5 - 48.6%) -- approx. 3HKO Porygon2 @ Eviolite Ability: Trace
Shiny: Yes
EVs: 252 HP / 4 Def / 252 SpD
Sassy Nature
IVs: 0 Atk / 0 Spe
- Trick Room
- Magic Coat / Ice Beam
- Teleport
- Recover
General Role:
Alright, Trick Room Setter Number 3, this one is a pretty cool one. This serves as a Setter as well as a SpD wall with its Item Eviolite, boosting both its Defense Stats by 1.5x. This, as well as Cresselia lives most neutral hits and can provide the Team with safe switches and momentum in form of Teleport. There is not much more to it besides fitting the 3rd Trick Room Setter Spot and being kind of a glue for the team.
Moveset:
For Trick Room you can just fill the lines yourself, I think thats pretty self explanatory now. Alright so for the next move I opted for Magic Coat instead of Ice Beam for the cause of utility, blocking Taunts, hazards and Status is just so broken because this move is spammable, its not like Protect which fails after some time, you can spam it all the way. In combination with Trace this allows for some cool exchanges, since it can trace stuff like Water/Volt Absorb as well as Flash Fire. That way you can outplay
very well on Lead.
Lead Hatterene -> (good players will always magma on a Hatt Lead and not click rocks or Taunt) Hard Porygon2 and Trace Flash Fire and absorb Magma Storm -> Magic Coat to optimally bounce Taunt or Stealth rock -> If: bounced Taunt, then: Trick Room into Teleport, if else: hard to a breaker or just Teleport
EV/IV Spread:
Max/Max is here for optimally SpD walling, there is not much to it, it doesnt get more basic than that.
Defensive Calcs:
252 Atk Choice Band Triple Axel (40 BP) (3 hits) vs. 252 HP / 4 Def Eviolite Porygon2: 201-243 (53.7 - 64.9%) -- approx. 2HKO
252+ SpA Choice Specs Flamethrower vs. 252 HP / 252+ SpD Eviolite Porygon2 in Sun: 183-216 (48.9 - 57.7%) -- 95.3% chance to 2HKO
(be aware with this calc with Torkoal vs Volcanion)
252 Atk Choice Band Surging Strikes (3 hits) vs. 252 HP / 4 Def Eviolite Porygon2 on a critical hit: 201-243 (53.7 - 64.9%) -- approx. 2HKO
+2 252 SpA Thunderbolt vs. 252 HP / 252+ SpD Eviolite Porygon2 in Electric Terrain: 153-181 (40.9 - 48.3%) -- guaranteed 3HKO
252 Atk Choice Band
Triple Axel (40 BP) (3 hits) vs. 252 HP / 4 Def Eviolite Porygon2: 201-243 (53.7 - 64.9%) -- approx. 2HKO252+ SpA Choice Specs
Flamethrower vs. 252 HP / 252+ SpD Eviolite Porygon2 in Sun: 183-216 (48.9 - 57.7%) -- 95.3% chance to 2HKO(be aware with this calc with Torkoal vs Volcanion)
252 Atk Choice Band
Surging Strikes (3 hits) vs. 252 HP / 4 Def Eviolite Porygon2 on a critical hit: 201-243 (53.7 - 64.9%) -- approx. 2HKO+2 252 SpA
Thunderbolt vs. 252 HP / 252+ SpD Eviolite Porygon2 in Electric Terrain: 153-181 (40.9 - 48.3%) -- guaranteed 3HKO Torkoal @ Choice Specs Ability: Drought
EVs: 248 HP / 252 SpA / 8 SpD
or: 252 Def / 252 SpA / 4 SpD (if Body Press)
Quiet Nature
IVs: 0 Atk / 0 Spe
- Eruption
- Earth Power
- Solar Beam / Body Press
- Weather Ball
General Role:
Ok so finally we get to the Heat. This Pokemon is just a nightmare to face since even resists get 2HKOed by this monstrosities'150BP Eruption under Sun. This Pokemon can set up Sun for the team for 5 Turns and just shred through almost anything in the Metagame. I'd recommend you try it out and see for yourself what I mean, make the right predicts and barely anything lives, have fun going through your opponents Easy Breezy ;D. If you dont want to have to predict you can use Charcoal also but it misses out on a lot of important 2HKOes vs Resists
Moveset:
Alright so Eruption is the main STAB you want to be clicking with this Pokemon. 150BP Specs STAB under Sun is just broken af, try it out for yourself so you will see what I mean. Earth Power is one of two coverage moves I opted for, notably for getting rid of
. Solar Beam is the second coverage move I put on this, instant charges in Sun are really nice and 120BP can hit some Water Types crazy hard f.E or that otherwise might give you a lot of trouble breaking. As a last move I opted for Weather Ball since it, unlike Eruption has a consistent damage output which doesnt rely on having high HP. this can be important in some Matchups which I will get to later on. If you want a better Matchup versus Tyranitar I recommend you use Body Press instead of Solar Beam if you feel comfortable in beating stuff like among other bulky watersEV/IV Spread:
Alright so I would like to say that the EV Spreads on the breakers are as simple as the Trick Room setters Spreads, just offensively. Max Attack stat of your choice plus usually Max HP or close to it for Bulk.
Offensive Calcs:
252 Def Torkoal Body Press vs. 0 HP / 0 Def : 340-404 (99.7 - 118.4%) -- 93.8% chance to OHKO
252+ SpA Choice Specs Torkoal Eruption (150 BP) vs. 252 HP / 0 SpD in Sun: 181-213 (52.6 - 61.9%) -- 98.8% chance to 2HKO after Leftovers recovery
252+ SpA Choice Specs Torkoal Eruption (150 BP) vs. 252 HP / 4 SpD in Sun: 348-411 (48.7 - 57.5%) -- 94.5% chance to 2HKO
252+ SpA Choice Specs Torkoal Eruption (150 BP) vs. 252 HP / 4 SpD in Sun: 166-196 (54.6 - 64.4%) -- guaranteed 2HKO
252+ SpA Choice Specs Torkoal Eruption (150 BP) vs. 252 HP / 176+ SpD in Sun: 217-256 (55 - 64.9%) -- guaranteed 2HKO
252+ SpA Choice Specs Torkoal Eruption (150 BP) vs. 0 HP / 0 SpD in Sun: 342-403 (100.2 - 118.1%) -- guaranteed OHKO
252+ SpA Choice Specs Torkoal Earth Power vs. 252 HP / 136+ SpD: 368-436 (95.3 - 112.9%) -- 75% chance to OHKO
252+ SpA Choice Specs Torkoal Earth Power vs. 0 HP / 4 SpD: 262-310 (87 - 102.9%) -- 18.8% chance to OHKO
252+ SpA Choice Specs Torkoal Solar Beam vs. 252 HP / 252+ SpD: 218-258 (55.3 - 65.4%) -- guaranteed 2HKO
Defensive Calcs:
0 Atk Earthquake vs. 248 HP / 0 Def Torkoal: 222-264 (64.7 - 76.9%) -- guaranteed 2HKO
252 SpA Choice Specs Shadow Ball vs. 248 HP / 8 SpD Torkoal: 217-256 (63.2 - 74.6%) -- guaranteed 2HKO
252 SpA Earth Power vs. 248 HP / 8 SpD Torkoal: 260-308 (75.8 - 89.7%) -- guaranteed 2HKO
252+ Atk Choice Band Earthquake vs. 248 HP / 0 Def Torkoal: 288-340 (83.9 - 99.1%) -- guaranteed 2HKO
252 Atk Earthquake vs. 248 HP / 0 Def Torkoal: 246-290 (71.7 - 84.5%) -- guaranteed 2HKO
252 Atk Choice Band Close Combat vs. 248 HP / 0 Def Torkoal: 220-259 (64.1 - 75.5%) -- 6.3% chance to OHKO after Stealth Rock
252 Def Torkoal Body Press vs. 0 HP / 0 Def
: 340-404 (99.7 - 118.4%) -- 93.8% chance to OHKO252+ SpA Choice Specs Torkoal Eruption (150 BP) vs. 252 HP / 0 SpD
in Sun: 181-213 (52.6 - 61.9%) -- 98.8% chance to 2HKO after Leftovers recovery252+ SpA Choice Specs Torkoal Eruption (150 BP) vs. 252 HP / 4 SpD
in Sun: 348-411 (48.7 - 57.5%) -- 94.5% chance to 2HKO252+ SpA Choice Specs Torkoal Eruption (150 BP) vs. 252 HP / 4 SpD
in Sun: 166-196 (54.6 - 64.4%) -- guaranteed 2HKO252+ SpA Choice Specs Torkoal Eruption (150 BP) vs. 252 HP / 176+ SpD
in Sun: 217-256 (55 - 64.9%) -- guaranteed 2HKO252+ SpA Choice Specs Torkoal Eruption (150 BP) vs. 0 HP / 0 SpD
in Sun: 342-403 (100.2 - 118.1%) -- guaranteed OHKO252+ SpA Choice Specs Torkoal Earth Power vs. 252 HP / 136+ SpD
: 368-436 (95.3 - 112.9%) -- 75% chance to OHKO252+ SpA Choice Specs Torkoal Earth Power vs. 0 HP / 4 SpD
: 262-310 (87 - 102.9%) -- 18.8% chance to OHKO252+ SpA Choice Specs Torkoal Solar Beam vs. 252 HP / 252+ SpD
: 218-258 (55.3 - 65.4%) -- guaranteed 2HKODefensive Calcs:
0 Atk
Earthquake vs. 248 HP / 0 Def Torkoal: 222-264 (64.7 - 76.9%) -- guaranteed 2HKO252 SpA Choice Specs
Shadow Ball vs. 248 HP / 8 SpD Torkoal: 217-256 (63.2 - 74.6%) -- guaranteed 2HKO252 SpA
Earth Power vs. 248 HP / 8 SpD Torkoal: 260-308 (75.8 - 89.7%) -- guaranteed 2HKO252+ Atk Choice Band
Earthquake vs. 248 HP / 0 Def Torkoal: 288-340 (83.9 - 99.1%) -- guaranteed 2HKO252 Atk
Earthquake vs. 248 HP / 0 Def Torkoal: 246-290 (71.7 - 84.5%) -- guaranteed 2HKO252 Atk Choice Band
Close Combat vs. 248 HP / 0 Def Torkoal: 220-259 (64.1 - 75.5%) -- 6.3% chance to OHKO after Stealth Rock Marowak-Alola @ Thick Club Ability: Rock Head
EVs: 248 HP / 252 Atk / 8 SpD
Brave Nature
IVs: 0 Spe (or 1 Spe / 2 Spe)
- Flare Blitz
- Poltergeist
- Swords Dance
- Earthquake / Bonemerang
General Role:
Alright Breaker Number 2, Marowak-Alola is just THE Staple Breaker of Trick Room Teams. Thick Club basically gives this mon a 160 Base Attack which is mind-boggling. This Thing hits like a Monster Truck and with the access to Swords Dance this is just a menace is every way. This Pokemon also makes use of
's Sun and can help break down its checks like so Torkoal can sweep.Moveset:
Flare Blitz is really spammable on this and with Poltergeist this will be what you will mostly aim to click. Poltergeist is next up and also mandatory on this. Poltergeist can miss but it is still a very broken move regardless, being able to see what Items the target has on top of hitting insanely hard. Swords Dance is overkill in most cases but sometimes needed so you can setup since you almost always live a hit so it is there too. Alright so for the last slot you can go either Earthquake or Bonemerang. Since Bonemerang just has 90% accuracy instead of 100% I'd recommend you to use Earthquake instead but if you want something vs Grassy Terrain shenanigans then sure, go for it.
EV/IV Spread:
Same here as Torkoal, HP lets it sponge some hits and KO back which is really nice. Usually you go 0 IVs in Speed but in Trick Room Mirror Matchups 1 EV in speed can ensure you outspeed opposing Marowaks outside of Trick Room, which it will usually come down to. Use whichever you prefer :D
Offensive Calcs:
-1 252+ Atk Thick Club Marowak-Alola Flare Blitz vs. 252 HP / 0 Def in Sun: 339-400 (88.7 - 104.7%) -- 31.3% chance to OHKO
+2 252+ Atk Thick Club Marowak-Alola Earthquake vs. 252 HP / 252+ Def: 368-434 (121 - 142.7%) -- guaranteed OHKO
+2 252+ Atk Thick Club Marowak-Alola Poltergeist vs. 252 HP / 192+ Def: 390-459 (113.3 - 133.4%) -- guaranteed OHKO
252+ Atk Thick Club Marowak-Alola Poltergeist vs. 0 HP / 0 Def: 297-351 (83.1 - 98.3%) -- guaranteed 2HKO after Leftovers recovery
252+ Atk Thick Club Marowak-Alola Poltergeist vs. 0 HP / 4 Def: 283-334 (82.9 - 97.9%) -- guaranteed 2HKO
252+ Atk Thick Club Marowak-Alola Earthquake vs. 0 HP / 0 Def: 318-376 (93.2 - 110.2%) -- 62.5% chance to OHKO
Defensive Calcs:
0 SpA Earth Power vs. 0 HP / 4 SpD Marowak-Alola: 194-230 (74.3 - 88.1%) -- guaranteed 2HKO
116 Atk Earthquake vs. 0 HP / 0 Def Marowak-Alola: 198-234 (75.8 - 89.6%) -- guaranteed 2HKO
Sponges most neutral hits and dies to the common super effective moves other than that
-1 252+ Atk Thick Club Marowak-Alola Flare Blitz vs. 252 HP / 0 Def
in Sun: 339-400 (88.7 - 104.7%) -- 31.3% chance to OHKO+2 252+ Atk Thick Club Marowak-Alola Earthquake vs. 252 HP / 252+ Def
: 368-434 (121 - 142.7%) -- guaranteed OHKO+2 252+ Atk Thick Club Marowak-Alola Poltergeist vs. 252 HP / 192+ Def
: 390-459 (113.3 - 133.4%) -- guaranteed OHKO252+ Atk Thick Club Marowak-Alola Poltergeist vs. 0 HP / 0 Def
: 297-351 (83.1 - 98.3%) -- guaranteed 2HKO after Leftovers recovery252+ Atk Thick Club Marowak-Alola Poltergeist vs. 0 HP / 4 Def
: 283-334 (82.9 - 97.9%) -- guaranteed 2HKO252+ Atk Thick Club Marowak-Alola Earthquake vs. 0 HP / 0 Def
: 318-376 (93.2 - 110.2%) -- 62.5% chance to OHKODefensive Calcs:
0 SpA
Earth Power vs. 0 HP / 4 SpD Marowak-Alola: 194-230 (74.3 - 88.1%) -- guaranteed 2HKO116 Atk
Earthquake vs. 0 HP / 0 Def Marowak-Alola: 198-234 (75.8 - 89.6%) -- guaranteed 2HKOSponges most neutral hits and dies to the common super effective moves other than that
Stakataka @ Life Orb Ability: Beast Boost
Shiny: Yes
EVs: 252 HP / 252 Atk / 4 SpD
Lonely Nature
IVs: 15 Def / 0 Spe
- Gyro Ball
- Earthquake
- Stone Edge
- Heat Crash
General Role:
Last off we have the golden Block itself, breaker Number 3. You may think what makes this better than
. Well, so, on this Team, after thorough testing I came to the conclusion it fits the role of a breaker better than melmetal does. Being able to OHKO is really valuable, boosting your Attack after each kill lets you Snowball very fast and 2 great STABs on top of good coverage made the choice for me easier that this was better than Melmetal on this team.Moveset:
First off is Gyro Ball, a usually very consistent STAB since Stakataka is so slow it often hits above 100BP at the very least. Earthquake is to hit
and other would be checks to it while Stone Edge as the second STAB can also hit many threats to great damage. Heat Crash over Trick Room just feels way more smooth and consistent, being able to OHKO a lot of things, especially under Sun.EV/IV Spread:
Alright so I think I only have to explain the IVs here which are 15 Defense IVs, this is so it hits 397 defense and 397 Attack. In case of a Tie it will always pick in the following order " Attack, Defense, Special Attack, Special Defense, and Speed ". This way you maximize your Defense while still ensuring Attack Boosts 100% of the time.
Offensive Calcs:
252+ Atk Life Orb Stakataka Gyro Ball (150 BP) vs. 252 HP / 0 Def: 386-454 (101 - 118.8%) -- guaranteed OHKO
252+ Atk Life Orb Stakataka Heat Crash (120 BP) vs. 252 HP / 252+ Def: 447-530 (126.9 - 150.5%) -- guaranteed OHKO
252+ Atk Life Orb Stakataka Stone Edge vs. 252 HP / 0 Def: 224-265 (58 - 68.6%) -- guaranteed 2HKO after Leftovers recovery
252+ Atk Life Orb Stakataka Gyro Ball (150 BP) vs. 0 HP / 4 Def: 445-524 (140.3 - 165.2%) -- guaranteed OHKO
252+ Atk Life Orb Stakataka Earthquake vs. 128 HP / 0 Def: 231-273 (52.1 - 61.6%) -- guaranteed 2HKO
252+ Atk Life Orb Stakataka Gyro Ball (150 BP) vs. 252 HP / 4 Def : 421-497 (116.2 - 137.2%) -- guaranteed OHKO
252+ Atk Life Orb Stakataka Earthquake vs. 252 HP / 252+ Def: 169-200 (55.5 - 65.7%) -- guaranteed 2HKO
+1 252+ Atk Life Orb Stakataka Stone Edge vs. 248 HP / 56 Def Multiscale: 347-409 (90.1 - 106.2%) -- 37.5% chance to OHKO
Defensive Calcs:
Just don't Stay in on Fighting and Ground Moves and you are good to go ;D
252+ Atk Life Orb Stakataka Gyro Ball (150 BP) vs. 252 HP / 0 Def
: 386-454 (101 - 118.8%) -- guaranteed OHKO 252+ Atk Life Orb Stakataka Heat Crash (120 BP) vs. 252 HP / 252+ Def
: 447-530 (126.9 - 150.5%) -- guaranteed OHKO 252+ Atk Life Orb Stakataka Stone Edge vs. 252 HP / 0 Def
: 224-265 (58 - 68.6%) -- guaranteed 2HKO after Leftovers recovery 252+ Atk Life Orb Stakataka Gyro Ball (150 BP) vs. 0 HP / 4 Def
: 445-524 (140.3 - 165.2%) -- guaranteed OHKO 252+ Atk Life Orb Stakataka Earthquake vs. 128 HP / 0 Def
: 231-273 (52.1 - 61.6%) -- guaranteed 2HKO 252+ Atk Life Orb Stakataka Gyro Ball (150 BP) vs. 252 HP / 4 Def
: 421-497 (116.2 - 137.2%) -- guaranteed OHKO 252+ Atk Life Orb Stakataka Earthquake vs. 252 HP / 252+ Def
: 169-200 (55.5 - 65.7%) -- guaranteed 2HKO +1 252+ Atk Life Orb Stakataka Stone Edge vs. 248 HP / 56 Def Multiscale
: 347-409 (90.1 - 106.2%) -- 37.5% chance to OHKO Defensive Calcs:
Just don't Stay in on Fighting and Ground Moves and you are good to go ;D
3. Teambuilding Process
So starting with these 3, they are just undoubtedly the best Trick Room setters there are, so it was an easy choice for me to make
yeah I like the hot Turtle and under TR its crazy strong so I went with that
Absolute must-have on Trick Room Teams, decision was easy since it helped break down Torkoals would be checks like Slowking
for the above mentioned reasons I switched Melmetal out and brought this Beast in
4. Threat List
This can be beaten but it's annoying to face since Quad resist to Torkoal and specs flamethrower 2HKOes P2 in Sun which sucks so just be careful around this and play Stakataka and Marowak well
not too much of an issue unless the opponent plays it well, in that case just try to preserve Hatterene to threaten Psyshock etc.
This is probably the biggest Threat to the Team since Double Iron Bash can flinch. If you see this in Team preview ALWAYS lead Torkoal no matter what, if they lead melmetal click weather ball always, if not u have to switch so theres not much else you can do
Sand can be a bit wonky and CB TTar hits very hard but just try and play well with Marowak
This isnt really a threat, just annoying. Play Marowak well and you will be fine
really bad if this flinches, some mons can take hits but die to Iron head flinches, I recommend you make Bold plays in these Offense matchups
EVERY OTHER MATCHUP IS INSANELY DOABLE IF U MAKE APPROPRIATE READS WHERE NECESSARY!
5. How to use
2. Make sure you position yourself well: If you let off the gas with this team you will lose,position yourself so you are in control of the game and don't give your opponent any openings if you can
3. Enemy Threat Assessment: This is important, you got to know how you want to dance around the enemies threats, I detailed some of that in the Threat List
4. Make Reads when necessary: Don't fret to make bold plays and reads to force progress, there is no real 0/100 matchup with this, you can always win if you make the proper plays necessary, that's why this team is so strong and fun to use to me.
Small Showcase of how to use this and dance around some threats:


Tournament Game vs RaiZen1704 Balance with Melmetal


Almost perfect showcase of each mon vs DD Pult Weav Balance
6. Pokepaste
Regular Version: Click Me ^^
Charcoal ver w changed movesets (not recommended): Don't click me :tf:
My Nicknames: based
OPTIMIZED EVs VERSION (as of 9/11/22): BEST VERSION
7. Outro
For those who made it this far, thank you a lot for reading this, I appreciate it :D. I hope you enjoy this team, I've been working on this for well over a Month to get a good version down. Shoutouts to my great friends from the Phantom Troupe, you guys continue to motivate me to grind further time and time again. I am not just giving my all building-wise, also playing-wise I grind a lot and I hope to once earn a trophy in a Tournament, that would be awesome. If you guys have any Feedback or opinions on the Team feel free to share, I'm always looking to step up my game. I hope to continue delivering cool Teams that I enjoy, I am not looking to disappoint anytime soon, you guys rock. Have Fun with the Team.
GOODBYE EVERYONE!!! ^-^
Tournament Game vs RaiZen1704 Balance with Melmetal
Almost perfect showcase of each mon vs DD Pult Weav Balance
6. Pokepaste
Regular Version: Click Me ^^
Charcoal ver w changed movesets (not recommended): Don't click me :tf:
My Nicknames: based
OPTIMIZED EVs VERSION (as of 9/11/22): BEST VERSION
7. Outro
For those who made it this far, thank you a lot for reading this, I appreciate it :D. I hope you enjoy this team, I've been working on this for well over a Month to get a good version down. Shoutouts to my great friends from the Phantom Troupe, you guys continue to motivate me to grind further time and time again. I am not just giving my all building-wise, also playing-wise I grind a lot and I hope to once earn a trophy in a Tournament, that would be awesome. If you guys have any Feedback or opinions on the Team feel free to share, I'm always looking to step up my game. I hope to continue delivering cool Teams that I enjoy, I am not looking to disappoint anytime soon, you guys rock. Have Fun with the Team.
GOODBYE EVERYONE!!! ^-^
Last edited:


